15 Easy 5-Ingredient Dessert Recipes Everyone Can Make
Ready to satisfy your sweet tooth without breaking a sweat? These 15 viral 5-ingredient dessert recipes are perfect for beginners who want to whip up something delicious in no time. With simple steps and minimal fuss, you’ll be impressing friends and family with your newfound baking skills before you know it!
Easy Lemonade Sorbet
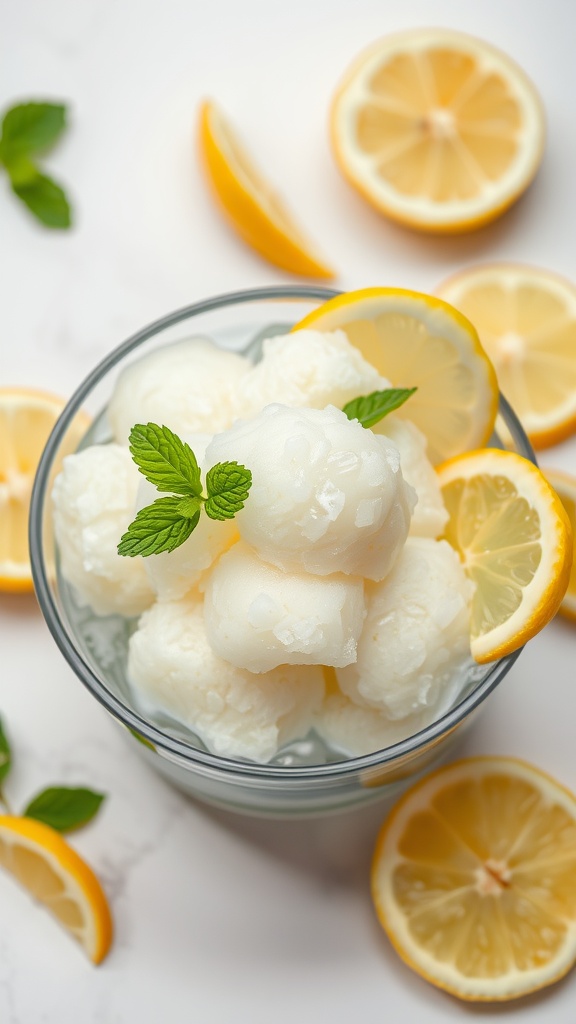
Looking for a refreshing treat that’s super simple to whip up? This Easy Lemonade Sorbet is the perfect combination of sweet and tangy, making it a delightful dessert for any time of year. With just five ingredients, it’s beginner-friendly and requires minimal effort, making it a go-to recipe for those warm days when you need something cool and satisfying.
The bright lemon flavor paired with its icy texture makes this sorbet a real crowd-pleaser. It’s perfect for serving at gatherings or just enjoying on your own. Plus, it’s a fun way to use up extra lemons!
5-Ingredient Berry Crumble
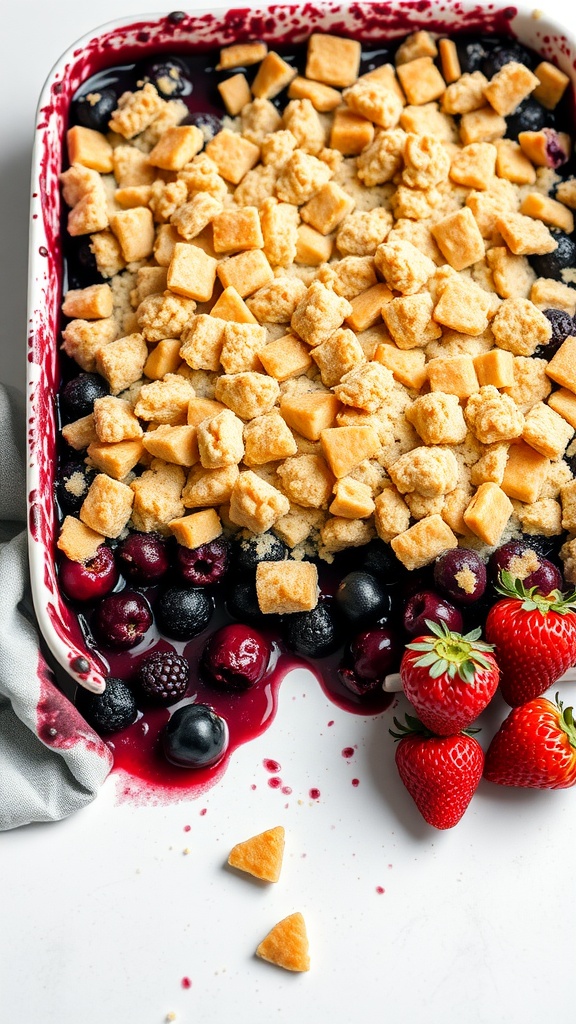
This 5-Ingredient Berry Crumble is a fantastic dessert that’s both easy to make and super satisfying. With a combination of fresh berries and a buttery crumble topping, it brings together sweet and tangy flavors in every bite. Perfect for beginners, this dessert requires minimal effort while delivering maximum taste!
Whether you’re hosting a gathering or just want a tasty treat, this crumble is a hit. It’s warm, comforting, and can be enjoyed on its own or with a scoop of vanilla ice cream. Let’s get to the recipe!
Peanut Butter Banana Ice Cream
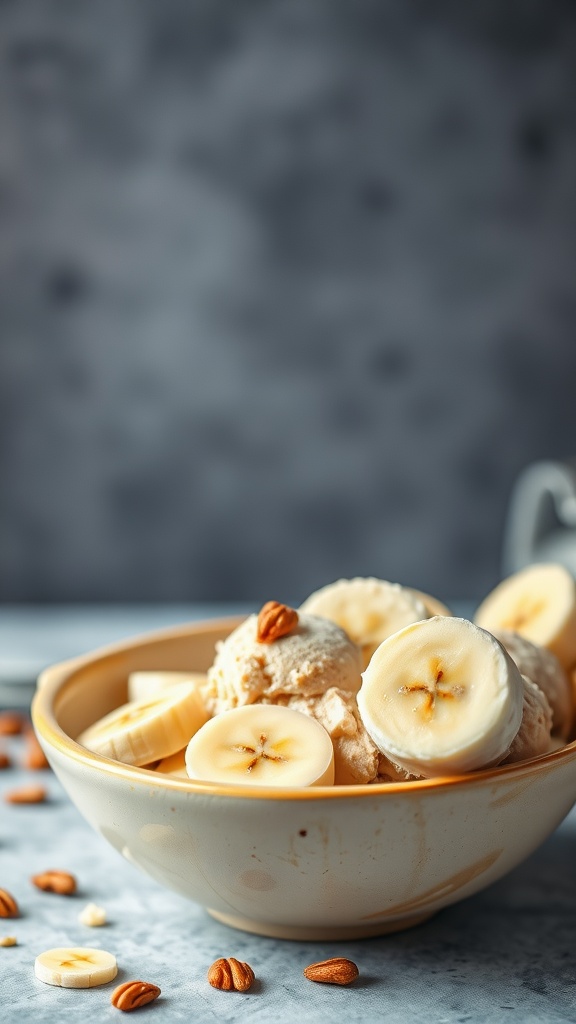
This Peanut Butter Banana Ice Cream is a simple, creamy delight that’s perfect for satisfying your sweet tooth without all the fuss. With just five ingredients, it combines the rich flavor of peanut butter with the natural sweetness of bananas, creating a treat that feels indulgent but is actually quite healthy.
The texture is smooth and creamy, making it a fantastic dessert to whip up for any occasion. Plus, it’s a great way to use up overripe bananas! This recipe is not only easy to make, but it also requires no ice cream maker—just a blender or food processor will do.
Ingredients
- 4 ripe bananas, sliced and frozen
- 1/2 cup creamy peanut butter
- 1 tablespoon honey or maple syrup (optional)
- 1 teaspoon vanilla extract
- 1/4 cup milk of your choice (dairy or non-dairy)
Instructions
- Blend Ingredients: In a blender or food processor, combine the frozen banana slices, peanut butter, honey or maple syrup, vanilla extract, and milk.
- Blend Until Smooth: Blend the mixture until it’s creamy and smooth, stopping to scrape down the sides as needed.
- Serve Immediately: You can enjoy it right away for a soft-serve texture, or transfer it to a container and freeze for about 1-2 hours for a firmer ice cream.
- Garnish and Enjoy: Serve in bowls and top with extra banana slices or nuts if desired!
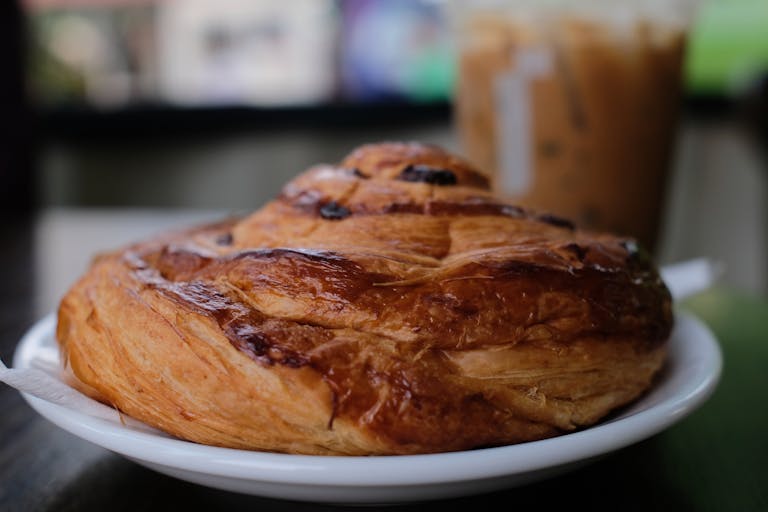
Nutella Stuffed Puff Pastry
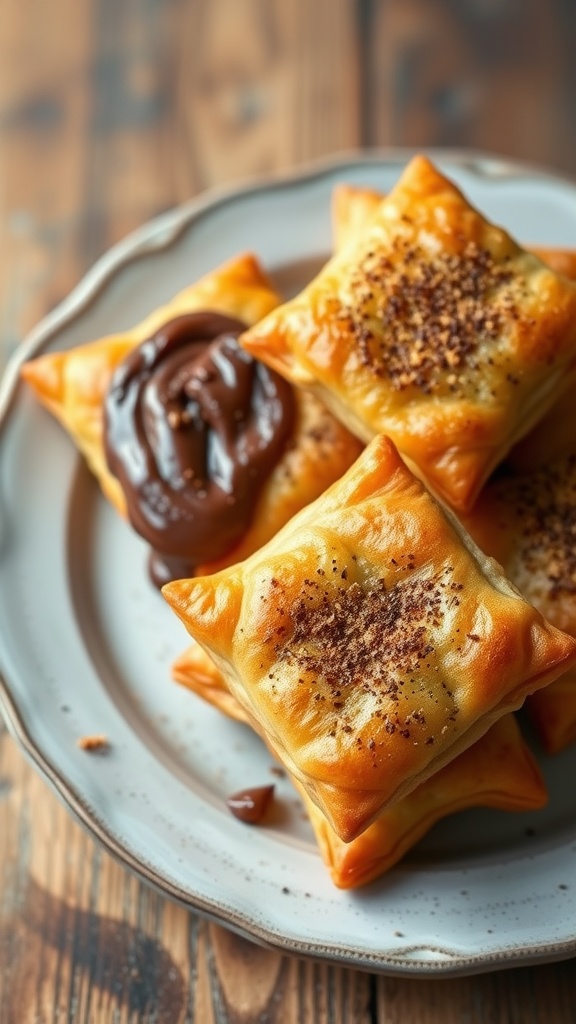
Nutella stuffed puff pastry is a delightful treat that combines the flaky texture of puff pastry with the rich, creamy goodness of Nutella. These bite-sized desserts are not just tasty; they’re incredibly easy to make, perfect for those who are new to baking. With just a few ingredients, you can whip up an impressive dessert that everyone will love.
The pastry comes out golden and crispy, while the warm Nutella filling creates a melty, decadent experience with every bite. Whether you’re hosting a gathering or simply treating yourself, this recipe is a fantastic choice that requires minimal time and effort.
Ingredients
- 1 sheet of puff pastry, thawed
- 1/2 cup Nutella
- 1 egg, beaten (for egg wash)
- 1 tablespoon sugar (for sprinkling)
- 1 teaspoon cinnamon (optional)
Instructions
- Preheat your oven to 400°F (200°C).
- Roll out the puff pastry on a lightly floured surface and cut it into squares, about 4×4 inches.
- In the center of each square, place a tablespoon of Nutella. Be careful not to overfill.
- Fold the pastry over to form a triangle and seal the edges by pressing down with a fork.
- Brush the tops with the beaten egg and sprinkle with sugar and cinnamon if using.
- Place the pastries on a baking sheet lined with parchment paper and bake for 15-20 minutes or until golden brown.
- Let them cool slightly before serving, and enjoy your delicious Nutella stuffed puff pastries!
Peach Cobbler with Biscuit Topping
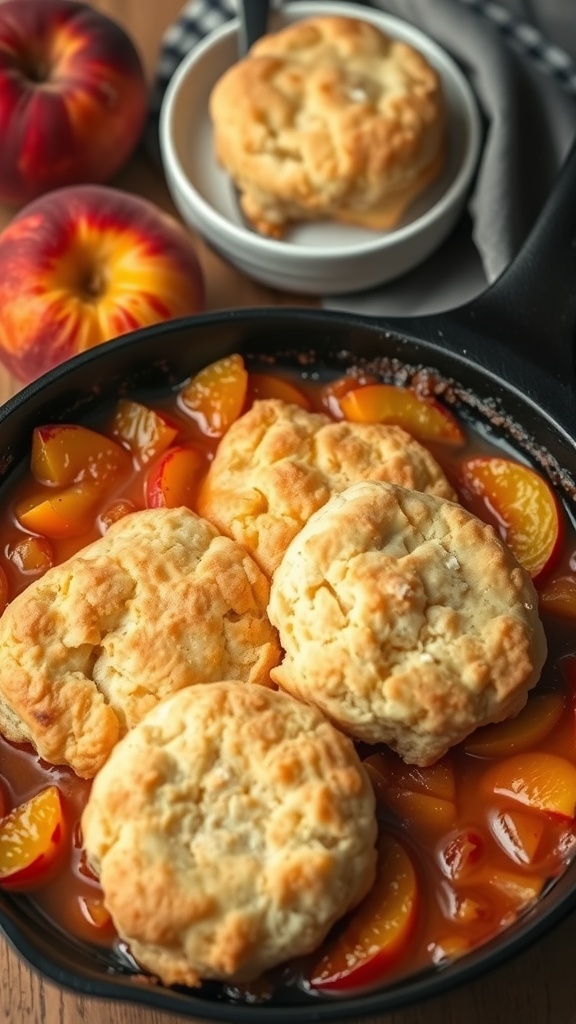
Peach cobbler with biscuit topping is a delightful dessert that brings together juicy peaches and a buttery, flaky topping. It’s sweet, comforting, and perfect for any occasion. The flavors meld beautifully, creating a warm, inviting dish that’s hard to resist.
The best part? This recipe is super simple! With just five ingredients, you can whip up this tasty treat in no time, making it ideal for beginners. Enjoy it warm, perhaps with a scoop of ice cream for an extra special touch!
Ingredients
- 4 cups fresh peaches, sliced
- 1 cup granulated sugar
- 1 tablespoon lemon juice
- 2 cups biscuit mix
- 1 cup milk
Instructions
- Preheat your oven to 350°F (175°C).
- In a bowl, combine the sliced peaches, half of the sugar, and lemon juice. Mix well and set aside.
- In another bowl, combine the biscuit mix, remaining sugar, and milk until a soft dough forms.
- Pour the peach mixture into a greased baking dish. Drop spoonfuls of the biscuit dough over the top of the peaches.
- Bake for about 30-35 minutes or until the biscuit topping is golden brown. Serve warm!
No-Bake Chocolate Oat Bars
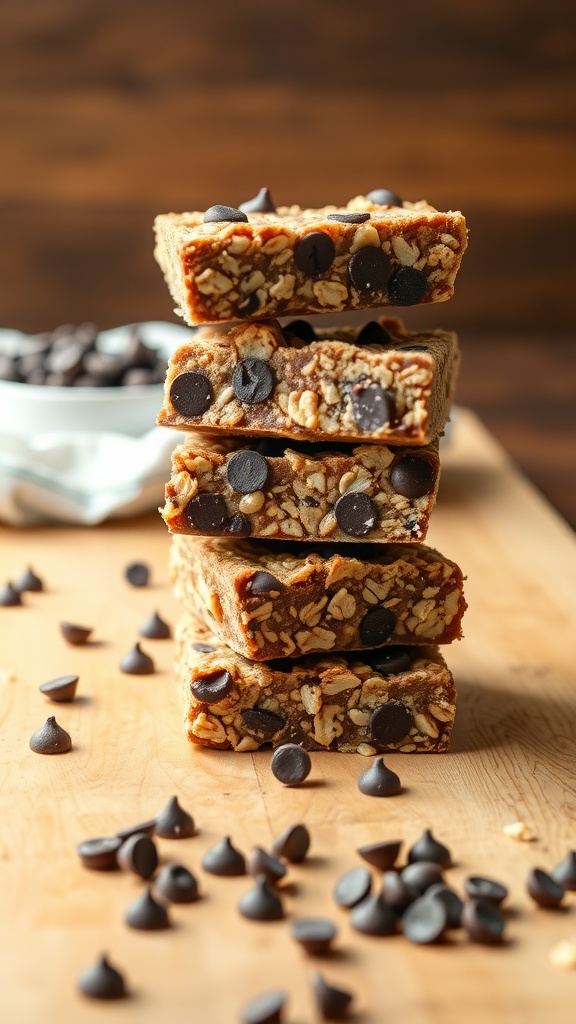
No-bake chocolate oat bars are a delightful treat that combines the hearty texture of oats with the rich sweetness of chocolate. They’re chewy, satisfying, and perfect for a quick dessert or snack. These bars are not only simple to make but also require minimal ingredients, making them beginner-friendly.
The combination of oats and chocolate creates a deliciously balanced flavor, with a hint of natural sweetness that’s hard to resist. Plus, there’s no need for an oven, so you can whip these up in no time and enjoy them chilled!
Ingredients
- 2 cups rolled oats
- 1/2 cup nut butter (like almond or peanut butter)
- 1/3 cup honey or maple syrup
- 1/2 cup chocolate chips
- 1/4 cup chopped nuts (optional)
Instructions
- Mix the Ingredients: In a large bowl, combine the rolled oats, nut butter, and honey or maple syrup. Stir until everything is well mixed.
- Add Chocolate: Fold in the chocolate chips and nuts, if using, until evenly distributed.
- Press into a Pan: Line an 8×8 inch baking dish with parchment paper. Pour the mixture into the pan and press it down firmly with the back of a spoon or your hands.
- Chill: Place the pan in the refrigerator for at least 1 hour to allow the bars to set.
- Cut and Serve: Once set, lift the bars out of the pan using the parchment paper. Cut into squares and enjoy!
Coconut Macaroons
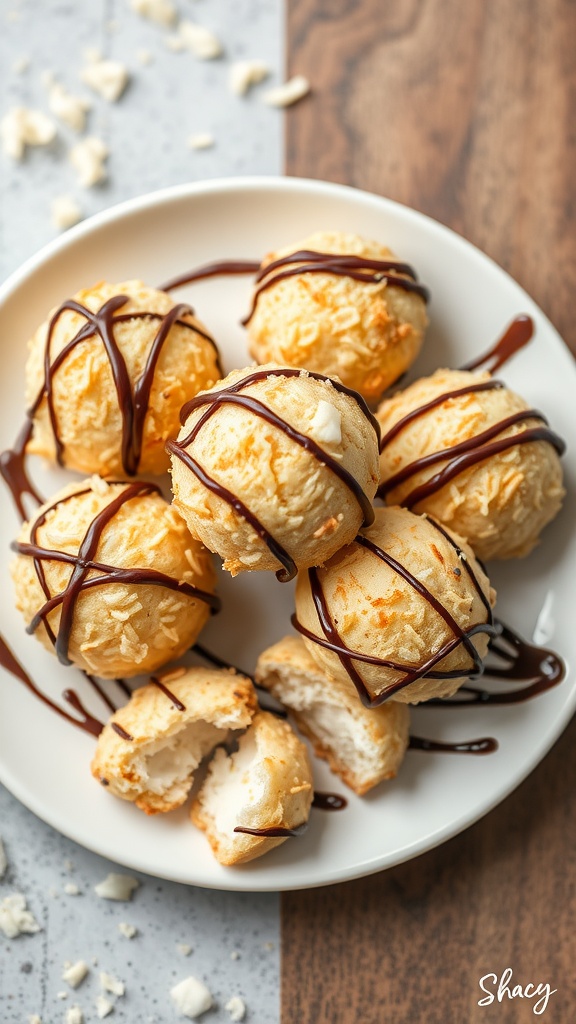
Coconut macaroons are a delightful treat that combines the chewy texture of coconut with a hint of sweetness. These little morsels are perfect for satisfying your sweet tooth without requiring complex techniques or a long list of ingredients. If you’re looking for a simple yet tasty dessert, this recipe is a fantastic choice!
With just five ingredients, coconut macaroons are an ideal beginner-friendly recipe. The blend of coconut and chocolate makes for an irresistible combination that everyone will enjoy. Plus, they can be made in under an hour, making them perfect for any occasion!
Ingredients
- 2 3/4 cups shredded sweetened coconut
- 2/3 cup sweetened condensed milk
- 1 teaspoon vanilla extract
- 1/4 teaspoon salt
- 4 ounces semi-sweet chocolate, melted
Instructions
- Preheat the oven to 325°F (160°C) and line a baking sheet with parchment paper.
- In a large bowl, mix together the shredded coconut, sweetened condensed milk, vanilla extract, and salt until well combined.
- Using your hands or a scoop, form small balls of the mixture and place them on the prepared baking sheet.
- Bake for 20-25 minutes, or until the edges are golden brown. Allow them to cool completely on the baking sheet.
- Once cooled, drizzle the melted chocolate over the macaroons for an extra touch of sweetness. Let the chocolate set before serving.
Chocolate Chip Cookie Mug Cake
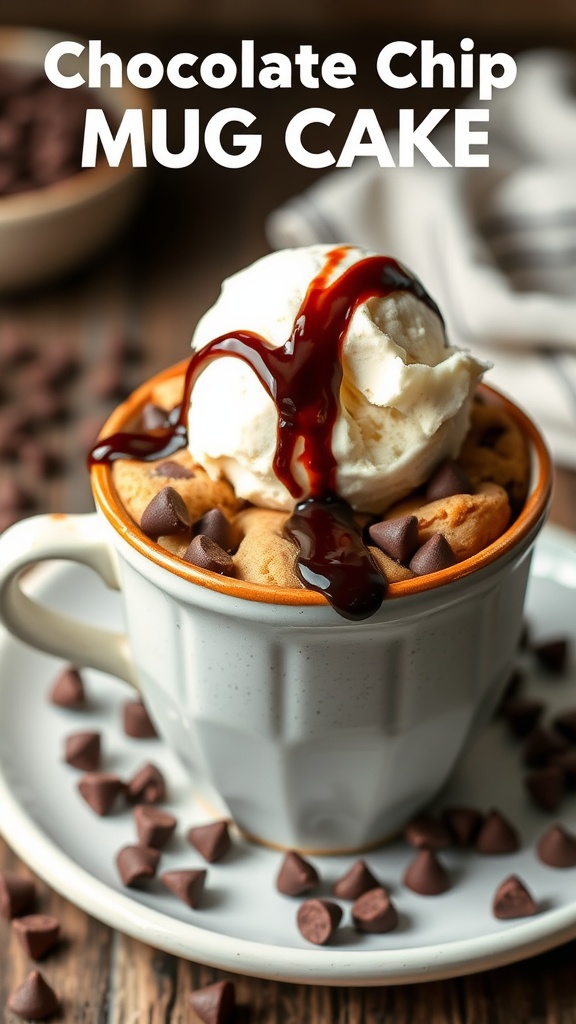
Chocolate chip cookie mug cake is a quick and delicious treat that combines the classic flavors of chocolate chip cookies in a warm, gooey cake form. It has a rich, buttery taste with melty chocolate chips, making it a perfect indulgence for any sweet tooth. Plus, it’s super easy to make—ideal for beginners!
This single-serving dessert comes together in just minutes, making it perfect for those late-night cravings or when friends drop by unexpectedly. With just five ingredients, you’ll whip up a delightful mug cake that’s guaranteed to impress. Let’s get to the recipe!
Ingredients
- 1 tablespoon unsalted butter
- 1 tablespoon granulated sugar
- 1 tablespoon brown sugar
- 1/4 teaspoon vanilla extract
- 2 tablespoons all-purpose flour
- 1 tablespoon chocolate chips
Instructions
- Melt the butter in a microwave-safe mug for about 20 seconds.
- Add the granulated sugar, brown sugar, and vanilla extract to the melted butter, and mix well.
- Stir in the flour until just combined, then fold in the chocolate chips.
- Microwave the mug for 40 to 60 seconds, watching closely to prevent overcooking.
- Let it cool slightly before digging in, and enjoy your warm chocolate chip cookie mug cake!
Chocolate Dipped Strawberries

Chocolate dipped strawberries are a classic treat that combines the sweetness of fresh strawberries with rich, smooth chocolate. They’re super easy to make, making them perfect for beginners. The contrast of the juicy fruit and velvety chocolate creates a delightful taste that everyone loves.
Not only are they delicious, but they also make for a stunning dessert for any occasion. You can whip them up in no time, and they look great on a platter. Plus, they are great for sharing!
Ingredients
- 1 pound fresh strawberries
- 8 ounces dark chocolate, chopped
- 4 ounces white chocolate, chopped
- 1 tablespoon coconut oil (optional)
- Sprinkles or crushed nuts (optional)
Instructions
- Wash the strawberries and pat them dry with paper towels. Make sure they’re completely dry for the chocolate to stick properly.
- In a microwave-safe bowl, melt the dark chocolate with the coconut oil in 30-second intervals, stirring in between until smooth.
- Dip each strawberry into the melted dark chocolate, letting the excess drip off. Place them on a parchment-lined tray.
- For a decorative touch, melt the white chocolate in a similar manner and drizzle it over the dark chocolate dipped strawberries.
- If using, sprinkle some crushed nuts or sprinkles on top before the chocolate sets.
- Let the strawberries sit at room temperature or refrigerate until the chocolate hardens, about 30 minutes.
Vanilla Bean Pudding Cups
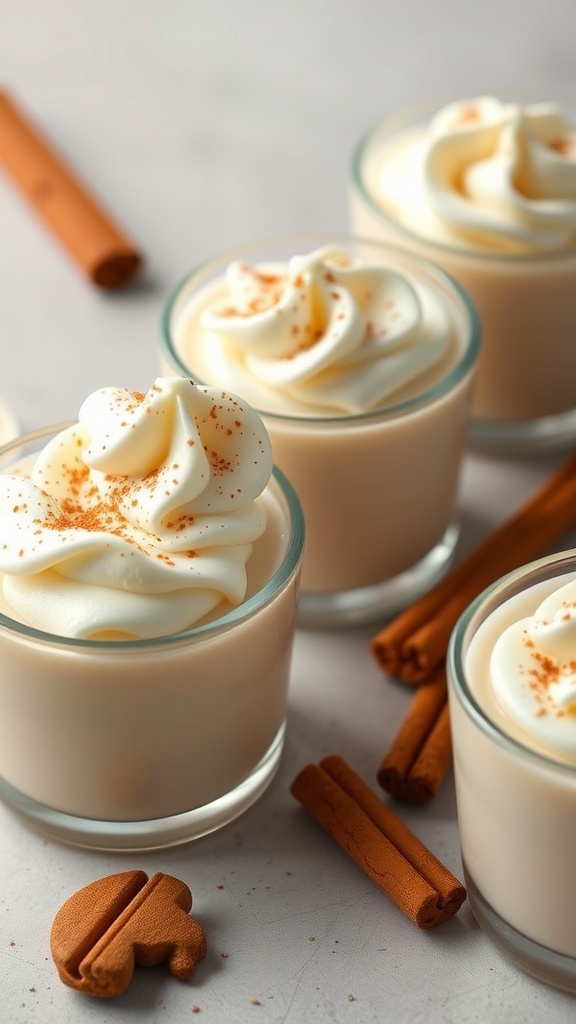
Vanilla bean pudding cups are a delightful treat that perfectly blend creamy texture with rich vanilla flavor. This simple dessert is not only delicious but also easy to whip up, making it perfect for beginners. The sweet aroma of vanilla beans combined with a smooth, velvety pudding creates a comforting dessert that everyone will love.
With just five ingredients, you can create these charming pudding cups in no time. They’re ideal for a quick weeknight dessert or a special occasion. Top them with whipped cream and a sprinkle of cinnamon for an extra touch of elegance!
Ingredients
- 2 cups whole milk
- 1/2 cup granulated sugar
- 1/4 cup cornstarch
- 1 vanilla bean (or 2 teaspoons vanilla extract)
- 1/4 teaspoon salt
Instructions
- In a medium saucepan, whisk together the milk, sugar, cornstarch, and salt.
- Split the vanilla bean lengthwise, scrape the seeds into the mixture, and add the pod as well. If using vanilla extract, add it later.
- Cook over medium heat, stirring constantly until the mixture thickens and begins to bubble, about 6–8 minutes.
- Once thick, remove from heat and discard the vanilla pod if used. Stir in the vanilla extract if applicable.
- Pour the pudding into serving cups and let it cool. Refrigerate for at least 2 hours before serving.
- Top with whipped cream and a sprinkle of cinnamon before enjoying!
Maple Pecan Pie Bites
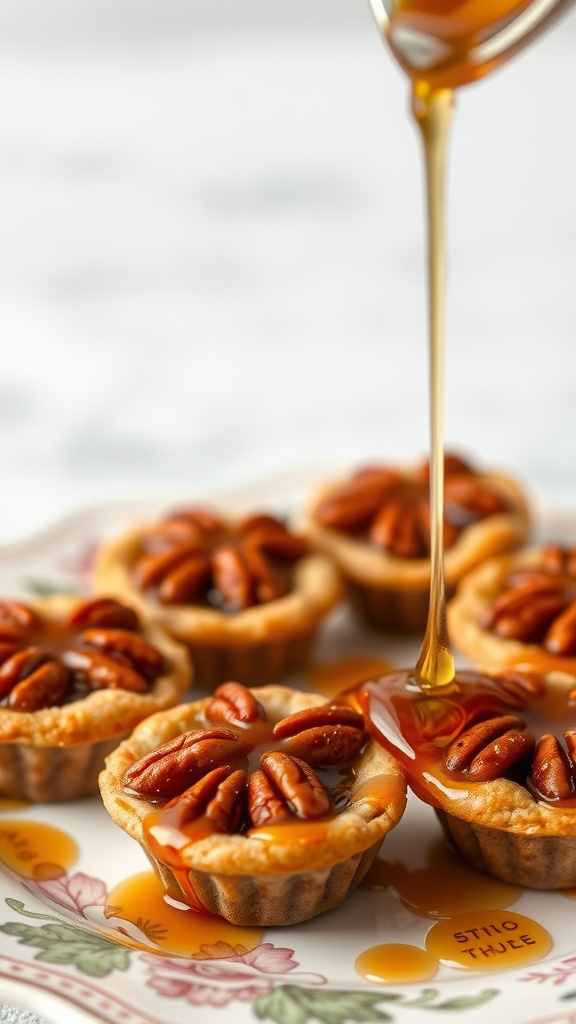
Maple pecan pie bites are a delightful twist on the classic dessert. These mini treats pack all the rich, nutty flavors of traditional pecan pie into bite-sized portions, making them perfect for sharing or indulging solo. With a sweet maple syrup filling and crunchy pecans, each bite is a perfect blend of sweetness and texture.
Best of all, this recipe is super simple, making it ideal for beginners. You only need five ingredients to whip up these tasty bites, and they come together quickly, allowing you to impress your family and friends without spending hours in the kitchen. Let’s dive into the recipe!
Ingredients
- 1 cup pecans, chopped
- 1 cup maple syrup
- 1/2 cup brown sugar
- 1/4 cup unsalted butter, melted
- 1 package of mini phyllo pastry cups
Instructions
- Preheat the oven to 350°F (175°C) and place the mini phyllo pastry cups on a baking sheet.
- In a bowl, mix together the maple syrup, brown sugar, and melted butter until well combined.
- Stir in the chopped pecans until evenly coated.
- Spoon the pecan mixture into each phyllo cup, filling them about three-quarters full.
- Bake for 15-20 minutes, or until the filling is bubbly and the pastry is golden brown. Allow to cool slightly before serving.
Quick Rice Krispie Treats
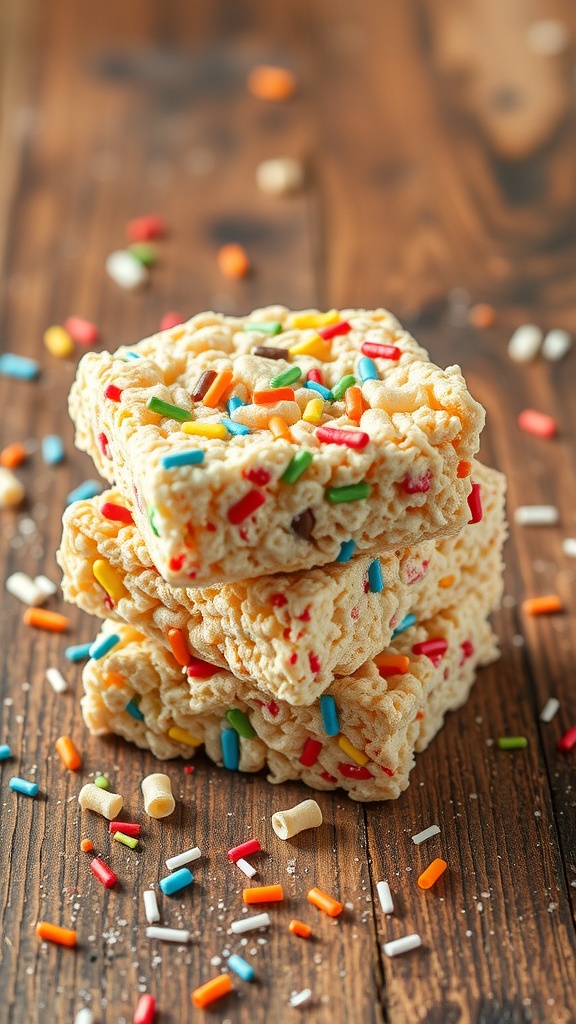
Rice Krispie Treats are a classic dessert that combines crispy rice cereal with gooey marshmallows and butter. They are sweet, chewy, and oh-so-satisfying, making them a favorite for both kids and adults alike. Plus, they are incredibly easy to make, requiring just a few simple ingredients!
This no-bake treat is perfect for beginner cooks, as it can be whipped up in under 30 minutes. With their delightful crunch and sweet flavor, they’re great for parties, snacks, or just a little indulgent treat after a long day. Get ready to impress your friends and family with these quick and fun treats!
Ingredients
- 3 tablespoons unsalted butter
- 4 cups mini marshmallows
- 6 cups Rice Krispies cereal
- 1/2 cup colorful sprinkles
- 1 teaspoon vanilla extract
Instructions
- Prepare the Pan: Grease a 9×13-inch baking dish with butter or cooking spray to prevent sticking.
- Melt Butter and Marshmallows: In a large pot over medium heat, melt the butter. Once melted, add the mini marshmallows, stirring continuously until completely melted and smooth.
- Add Cereal: Remove the pot from heat and stir in the Rice Krispies cereal until well coated with the marshmallow mixture.
- Mix in Sprinkles: Gently fold in the colorful sprinkles and vanilla extract for extra flavor and fun.
- Press into Pan: Pour the mixture into the prepared baking dish. Use a spatula or your hands (lightly greased) to press it down evenly.
- Cool and Cut: Allow the treats to cool for at least 30 minutes before cutting into squares. Enjoy your delicious Rice Krispie Treats!
Caramel Apple Dip
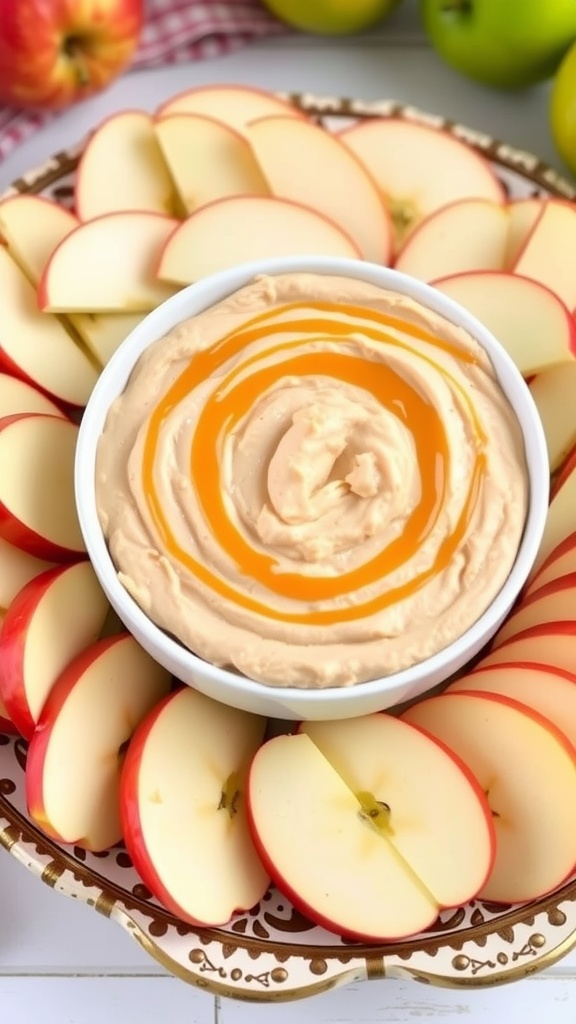
Caramel Apple Dip combines the sweet, creamy goodness of caramel with the fresh crunch of apple slices. It’s a delightful treat that’s incredibly easy to whip up, making it perfect for beginners. This dip is a crowd-pleaser, perfect for parties, picnics, or a cozy night in.
The rich caramel flavor paired with crisp apples creates a delicious balance that is both satisfying and refreshing. Plus, with just five ingredients, you can have this tasty dessert ready in no time!
Ingredients
- 8 oz cream cheese, softened
- 1 cup caramel sauce
- 1/4 cup powdered sugar
- 1 teaspoon vanilla extract
- Apple slices for serving
Instructions
- In a mixing bowl, combine softened cream cheese, caramel sauce, powdered sugar, and vanilla extract. Beat until smooth and creamy.
- Transfer the dip to a serving bowl and drizzle with additional caramel sauce on top for decoration.
- Serve immediately with fresh apple slices for dipping. Enjoy!
Chocolate Peanut Butter Fudge
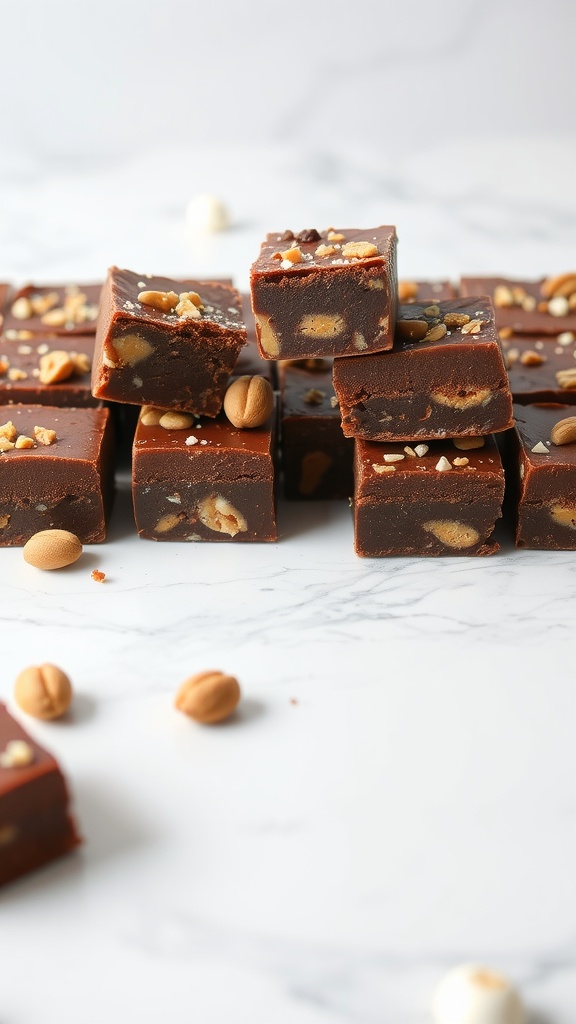
This Chocolate Peanut Butter Fudge is a simple and indulgent treat that balances creamy peanut butter with rich chocolate. It’s perfect for those who love a quick dessert that doesn’t require extensive cooking skills. Just a few ingredients bring this delightful fudge to life, making it a hit for both beginners and seasoned bakers alike.
This fudge has a smooth, melt-in-your-mouth texture and a flavor that’s both sweet and nutty. Whether enjoyed as an afternoon snack or served at a gathering, it’s sure to please everyone. Plus, it only takes a few minutes to prepare, and the hardest part is waiting for it to set!
Ingredients
- 2 cups semisweet chocolate chips
- 1 cup creamy peanut butter
- 1/4 cup unsalted butter
- 1 teaspoon vanilla extract
- 1 cup chopped nuts (optional)
Instructions
- Prepare the Pan: Line an 8×8 inch baking dish with parchment paper, leaving some overhang for easy removal.
- Melt the Ingredients: In a medium saucepan over low heat, combine chocolate chips, peanut butter, and butter. Stir until fully melted and smooth.
- Add Vanilla: Remove from heat and stir in the vanilla extract until well mixed.
- Add Nuts: If using, fold in the chopped nuts for added texture and flavor.
- Pour and Chill: Pour the fudge mixture into the prepared dish, spreading it evenly. Refrigerate for at least 2 hours or until firm.
- Cut and Serve: Once set, lift the fudge out of the dish using the parchment paper. Cut into squares and enjoy!
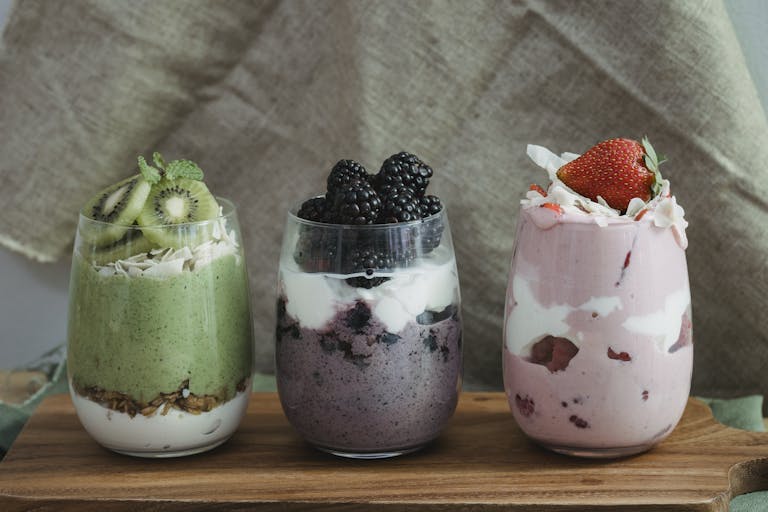
Fruit and Yogurt Parfaits
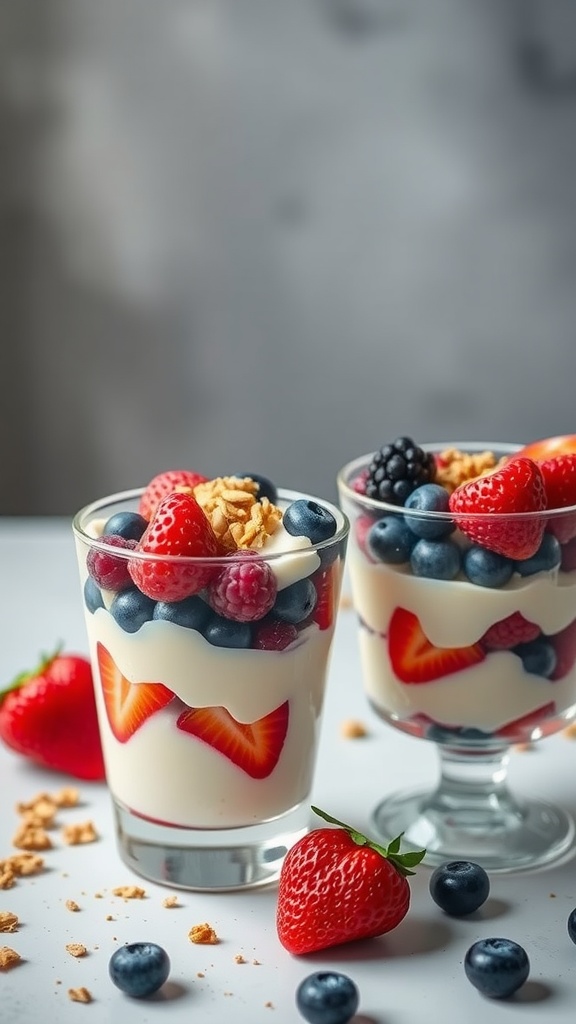
Fruit and yogurt parfaits are a delightful and simple dessert that brings together creamy yogurt and fresh fruits for a tasty treat. They are perfect for beginners, as they require no baking and can be customized to suit your taste preferences. The combination of tangy yogurt and sweet fruit creates a refreshing flavor that is hard to resist.
These parfaits are not only easy to make, but they also look great when served in layers. You can mix and match your favorite fruits, add some crunchy granola or nuts for texture, and drizzle with honey for extra sweetness. They are a great option for breakfast, a light dessert, or even a snack!
Ingredients
- 2 cups of your favorite yogurt (Greek or regular)
- 2 cups mixed berries (strawberries, blueberries, raspberries)
- 1 cup granola
- 2 tablespoons honey or maple syrup
- Mint leaves for garnish (optional)
Instructions
- In a glass or bowl, spoon a layer of yogurt at the bottom.
- Add a layer of mixed berries on top of the yogurt.
- Sprinkle a layer of granola over the berries.
- Repeat the layers until the glass is full, ending with a layer of yogurt and a few berries on top.
- Drizzle honey or maple syrup over the top and garnish with mint leaves if desired.